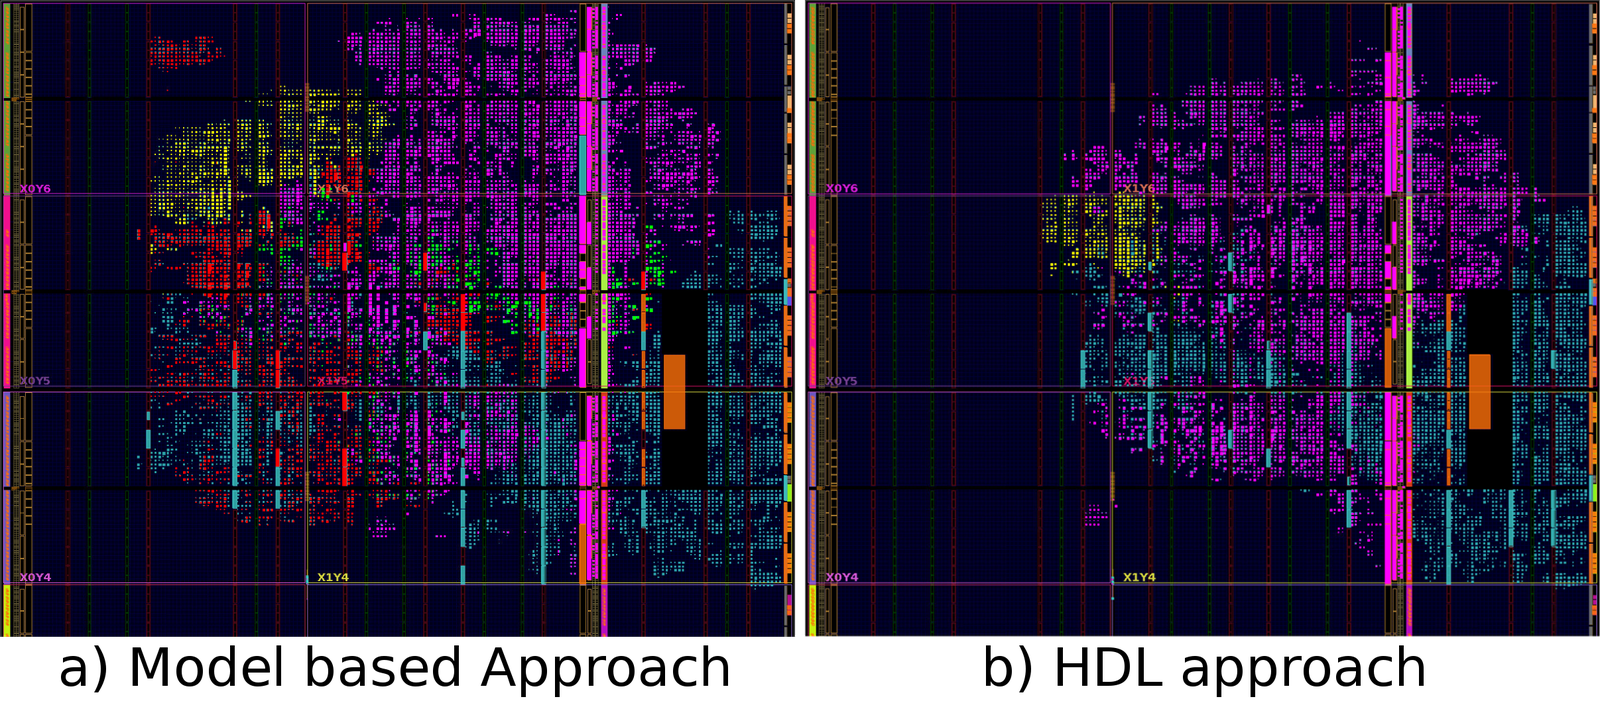
Comparison between model based approach and hdl approach for a DDR3 controller

In an earlier post I described a simple architecture for creating a FIFO-like DDR3 controller using Vivado's block design integrator tool. This tool is of great use when interconnecting various IP Cores with standard interfaces as it was the case. This however is usually not the most optimal implementation for a given design.

The usage of the DataMover in the architecture mentioned previously still required a FSM written in HDL language to control the different commands and achive the desired behavior. That FSM dealed with data sizes, addresses and status reports to move data from the AXI-S to the AXI-MM domain and viceversa.

After a more detailed review of the AXI-MM protocol the FSM used to issue commands to the DataMover could be easily modified to instead handle the AXI-MM interface of the Xilinx's DDR IP Core and therefore eliminating the need of the DataMover, the AXI-Interconnect and the Block Design tool.

The following image represents the resource utilization for both approaches.

/images/ddr-dm_ddr-axi.thumbnail.png

Comparizon of resources utilization between both approaches

The case a) represents the utilization of the different blocks in the model based approach

  • Yellow: HDL Block to control the DataMover
  • Purple: DDR Controller Block with AXI-MM Interface
  • Red: DataMover Block
  • Green: AXI-Interconnect Block
  • Blue: Input and Output FIFOs for DDR Controller and extra logic for PCIe communication

The case b) represents the utilization of the different blocks in the HDL approach

  • Yellow: HDL Block to control the DataMover
  • Purple: DDR Controller Block with AXI-MM Interface
  • Blue: Input and Output FIFOs for DDR Controller and extra logic for PCIe communication
Resource
Slice LUTs 19181 12557
Slice Registers 19262 10262
Muxes 421 4134
Slices 8542 5017
LUT FF Pairs 25096 15534
Block RAM tiles 31.5 15.5
% of Design 80 % 70 %

HDL approach (b) uses in average only 70 % of the resources of the model based approach (a)

FIFO-like Controller for DDR3 Memory

In an earlier post Correctly Matching Xilinx Native FIFOs to Streaming AXI FIFOs, I mentioned the advantages of interconnecting Xilinx's Native FIFOs to AXI-Streaming FIFOs and some special considerations on how to do it. Now, I would like to show a simple architecture to use the DDR3 memory as a Native FIFO.

The intention of this post is to show a possible implementation for creating a DDR3 Memory Controller which effectively remove from the end user the address handling for read and write operations and simply delivers a FIFO behaviour to the end user. There are many advantages on using a large DDR3 Memory (in the range of 1 to 4 GB) as regular FIFO. RAM Memory blocks on FPGA devices are very limited, therefore it is often required to use external devices for such purpose.

FIFOs are tipically used in FPGA designs as temporal buffers to accomodate temporal waiting states from the different logic blocks. It provides a great oportunity to cross clock domains as well. But in general they are very useful when we would like to buffer detector data which later will be used as part of an algorithm calculation when all calculations have concluded and then it is required to substract the original value from the calculated data several clock cycles after the original value arrived.

In this scenario, the limiting factor comes from the size of the FIFO that could be implemented entirely inside an FPGA. Internal storage is very small (~tens of MB) and therefore the need of designing a simple comtroller for encapsulating DDR3 transactions into input and output FIFO ports.

/images/s2mm_ddr_mm2s_general.thumbnail.png

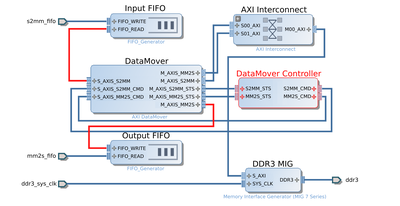
General architecture of the design

Using the Xilinx IP integrator tool, the previours design was implemented along with a custom FSM (represented by the DataMover Controller Block in the image) to control the data flow written in Verilog and integrated with the rest of the block design. The Verilog file contains two simple state machines for writing and reading operations of the DDR considering the current status of the input and output FIFOs.

/images/s2mm_fsm.thumbnail.png

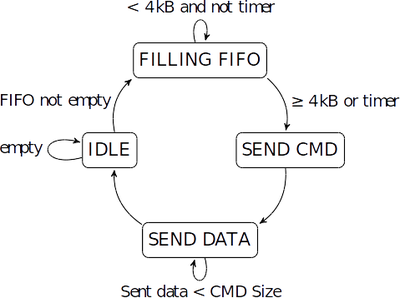
Finite state machine from streamming domain to DDR3 memory mapped domain.

The transfer of data from the input FIFO to the S2MM AXI-S port of the DataMover is managed by the state machine mentioned above. When the input FIFO is empty the FSM remains in the IDLE state. Once some data has arrived it moves to the FILLING FIFO state where it waits until one of two conditions are met. First the data size contained in the input FIFO has to be greater or equal to 4 kB or second the Timer signal has reached its maximum value. If one of those two conditions are met, then the FSM proceeds to the SEND CMD and SEND DATA states. The timer signal allows the system to not remain locked in case that less than 4 kB of data have arrived. The filling level of the FIFO is measured using the "More Accurate Data Counts" feature available in the "First Word Fall Through" FIFO. In this way there is an accurate representation of the data contained inside and therefore the size of the data to transfer can be calculated appropriately.

In the SEND DATA state the FSM issues read requests to the input FIFO and sends the data to the AXI-S interface of the DataMover following the special considerations mentioned in Correctly Matching Xilinx Native FIFOs to Streaming AXI FIFOs. The FSM takes care that the exact size of data declared in the SEND CMD state is read from the FIFO and transfered to the DataMover. Once the data has been transfered in its totality the state machine goes back to the initial IDLE state. It is also worth mentioning that the FIFO can receive more data at the same time it is reading and transferring to the DataMover. The state machine allows an accurate data size management so that no data is repeated or lost during the transmission, accurate data counters also provide a higher level of reliability to the overall transfer.

/images/mm2s_fsm.thumbnail.png

Finite state machine from DDR3 memory mapped domain to streamming domain.

The state machine will remain in the IDLE state until the writing address pointer is different from the reading address pointer. When the FSM is in the SEND CMD state it sends a read request with the appropriate size, but if the data to be read is larger than 8 MB, it is necessary to issue multiple commands with maximum "bytes to transfer" (bbt) being 8 MB. This limitation comes from the DataMover itself, the command have only 23 bits for the bbt parameter.
Configuring Xilinx FPGAs with impact in batch mode

There are times during the development phase of a project that it is necesary to configure the FPGA with several different versions of the Firmware as new features are added and tests with the hardware are required.

To some designers the impact software have too many pop-out windows asking for unrelevant information when all we want is to configure the device. By using the batch mode all gets reduce to a single terminal instruction.

impact -batch script.cmd

I created a simple bash script which takes the .bit filename and replace it in a general script template to allow configuration of the device with different filenames without having to modify the script by hand every time.

./fpga_config.sh -f FILENAME.bit

You can find the code and a sample batch script in github

git clone https://github.com/leardilap/FPGA_Conf.git

Installing Digilent USB-JTAG Programming Cable Drivers

Installing impact and the Digilent configuration cable drivers are not always a smooth task. The USB-JTAG cable is not supported directly with the driver provided by Xilinx in the Lab Tools, therefore it is necesarry to install external drivers.

In the Xilinx forums it is possible to find a great number of questions regarding the installation of the cable drivers but most of those solutions do not really work. The following is a proven simple set of instructions that will install correctly the drivers.

First you need to download the Lab Tools from the Xilinx website, then:

Install libraries

zypper in fxload
cnf fxload
zypper in libusb-0_1-4 libusb-1_0-0 libusbmuxd-devel libusbmuxd2

Install impact

tar -xvf Xilinx_LabTools_14.7_1015_1.tar
cd Xilinx_LabTools_14.7_1015_1
sudo ./xsetup

Install official cable drivers

cd /opt/Xilinx/14.7/LabTools/common/bin/lin64/digilent
sudo ./install_digilent.sh

Install .hex and rules in correct locations

cd /opt/Xilinx/14.7/LabTools/common/bin/lin64

sed xusbdfwu.rules -e 's:TEMPNODE:tempnode:g
s:SYSFS:ATTR:g
s:BUS:SUBSYSTEM:g
' > /etc/udev/rules.d/xusbdfwu.rules

cp xusb*.hex /usr/share

udevadm control --reload-rules

Run impact

source /opt/Xilinx/14.7/LabTools/settings64.sh
impact &

Correctly Matching Xilinx Native FIFOs to Streaming AXI FIFOs

It could be unusual to connect a Xilinx's Native FIFO interface to a streaming AXI FIFO, but sometimes this small trick might be necessary. For instance, the Native FIFOs can be configured with non-symmetric aspect ratios if the Independent Clocks Block RAM configuration is selected. This feature is very useful to appropriately cross different clock domains. For instance the input port of the FIFO could be at 100 MHz with a data width of 256 bits and the output at 50 MHz with a data with of 512 bits.

The AXI-Streaming FIFOs don't have the ability to configure different aspect ratios between the input and output ports, but they are compatible with different AXI standard IP blocks provided by Xilinx. The IP integrator tool of Vivado allows the easy interconnection between IP Cores using a graphical interface.

To demonstrate a case where this might be useful, a DDR3 controller is to be design using the IP Cores provided by Xilinx. The idea is to achieve a behavior so that a simple very large FIFO is instantiated instead of having to deal with addresses in the DDR3 Memory. For this the DataMover IP Block is selected, effectively translating the Address mapped domain (AXI-MM) into a streaming domain (AXI-S). This post will go only in the detail of interconnecting two Native FIFOs with different aspect ratios between input and output to the AXI-S interfaces of the DataMover which is the same interface as if it was a AXI-Streaming FIFO.

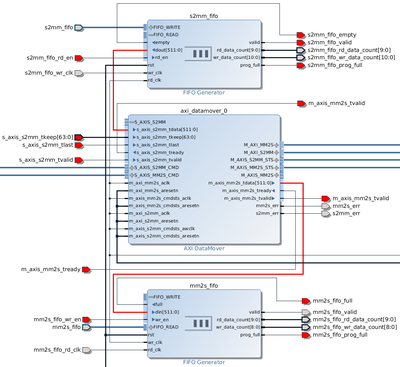
The Block Design tool of Vivado is not enough to implement some simple connections containing some logic gates, therefore it is necessary to create a small Verilog or VHDL file which do the connections for us. Also, in the case of using the Datamover as in the image, it also issues the commands and checks for the statuses.

/images/fifo_axis.thumbnail.png

Block Design

For a simple Native FIFO to AXI FIFO these are the only connections we would need to implement.

assign s_axis_s2mm_tkeep = 64'hFFFF_FFFF_FFFF_FFFF;

assign s2mm_fifo_rd_en = s_axis_s2mm_tready & ~s2mm_fifo_empty;
assign s_axis_s2mm_tvalid = s_axis_s2mm_tready & s2mm_fifo_valid & ~s2mm_fifo_empty;

assign m_axis_mm2s_tready = ~mm2s_fifo_prog_full;
assign mm2s_fifo_wr_en = m_axis_mm2s_tready & m_axis_mm2s_tvalid;
/images/fifo_axis_wavedrom.thumbnail.png

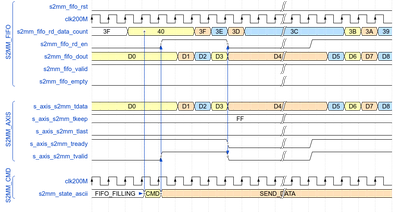
Waveform of the involved signals created with Wavedrom

One final remark is that the input FIFO, to convert from Native to Streaming FIFO it is necessary to be First Word Fall Through, this will correctly align the s_axis_s2mm_tready signal to the s_axis_s2mm_tvalid. For the output FIFO from Streaming to Native it is not required to have this feature, and probably we do not even want it, just by having the Valid signal when data is available is sufficient for the subsequent stages.

Automatically sort pictures based on the date they were taken

I have been a linux user almost exclusively for at least 4 years, mainly using ubuntu. One of the things I particularly liked was the way the default tool for importing pictures (Shotwell) manages the files and organize them depending on the date they were taken.

Shotwell will create an arrange of folders starting by the year, then the month and then the individual days, then put the corresponding pictures inside. As much as I liked this system, I always found myself wanting to organize then in a different way, where I could quickly look at a wider range of images, for example by year, but still be able to tell from the date and a short description the contents without opening the folder.

My ideal organization is a folder with the year, then inside the pictures organized by day, but still in the folder name I would like the whole date before a short description I will add later. Therefore having for example 2016/2016-01-17_KA-Snow/.

Another reason why I decided to search for a script to organize my pictures is because Shotwell started creating many small thumbnail files of the raw files inside the pictures folders and they were really annoying me, as much as I created another script to eliminate those thumbnails from Shotwell. Also, the performance when loading pictures from the camera to import wasn't the best, most of the time taking a great amount of time just to display how many pictures were available for importing.

For the previous mentioned reasons, I searched online first and found this code, which does part of the job I wanted, then I modified it and here is the code I am using now every time I connect my camera and would like to import the pictures.

To notice is that I added command line options -s and -d for source and destination paths respectively, so that I could organize different folders I already have. And finally I also added the raw file extension of my camera ".RW2". I still need to include support for the video files, which I still need to copy by hand.

sort.sh

#!/bin/bash

# defaults
source=/media/luisardila/5FC6-EB2A/DCIM/
destination=/home/luisardila/Pictures/2016/

# Goes through all jpeg files in source directory, grabs date from each
# and sorts them into destination folder in directories according to the date
# additionally it copies as well raw files with the same name as the jpeg
# (C) Luis Ardila 2016 <luis.ardila@bozica.co>

# Getting options from the commad line
while getopts ":s:d:" opt; do
        case $opt in
        s)   # source
                source=$OPTARG
                ;;
        d)   #destination
                destination=$OPTARG
                ;;
        \?)
                echo "Invalid option: -"$OPTARG"" >&2
                exit
                ;;
        :)
                echo "Option -"$OPTARG" requires an argument" >&2
                exit
                ;;
        esac
done
i=0
# Executing move of files
for file in $source*.jpg $source**/*.jpg $source*.JPG $source**/*.JPG # CAPS
do
        echo $file
        if test -e "$file"; then
                datepath="$(identify -verbose "${file}" | grep DateTimeOri | awk '{print $2 }' | sed s%:%-%g)"
                if [[ "${datepath}" == "" ]]; then
                        year="$(identify -verbose "${file}" | grep date:modify | awk '{print $2 }' | awk -F '[-]' '{print $1}')"
                        datepath="${year}_Random"
                fi
                if ! test -e "${destination}${datepath}"; then
                        mkdir -pv "${destination}${datepath}"
                fi
                mv -v "${file}" "${destination}${datepath}"
                rawfile=$(echo ${file} | sed 's/.JPG/.RW2/g')
                if test -e "$rawfile"; then
                   mv -v "${rawfile}" "${destination}${datepath}"
                fi
        i=$(( $i + 1  ))
        fi
        echo "moved $i files"
done

If you would like also to eliminate those annoying Shotwell thumbnails, here is what I do:

rmShotwell.sh

#!/bin/bash

find . -name "*shotwell*" -delete

Creating bozica.co

Once more I have decided to create a blog. I want to have an online space where I can organize and share my ideas about topics of my interest. Its main purpose is to document different activities that I do, for example, the creation of this very blog.

This blog is created with Nikola this is how you can get started in less than 5 minutes, you can also follow the official Getting started or the Handbook

  1. create virtual environment with python version 3

    mkvirtualenv --python=/usr/bin/python3 bozica
    python -V                                     # Python 3.4.3
    deactivate                                    # get out of virtualenv
    workon bozica                                 # enter virtualenv
    
  2. working on bozica virtualenv install nikola python package

    pip install nikola
    pip install webassets
    pip install pygal
    nikola init bozica
    
  3. answer nikola questions

  4. create post and build

    nikola new_post
    
  5. give a name to your first post, write it and save it.

    nikola build
    
  6. finally check out your blog by opening in your browser the address http://localhost:8000/ or typing in the terminal

    nikola serve --browser
    
  7. create a new theme based on http://bootswatch.com/ themes and theme bootstrap3 as parent

    nikola bootswatch_theme -n journal_bozica -s journal -p bootstrap3
    

from this point you can start customizing your blog to get the look that you want to achieve, these are good tutorials about customizing your theme.

  1. upload the content of folder /output to your favorite hosting server and domain and enjoy!

Linking libraries to simulate verilog altera megacores

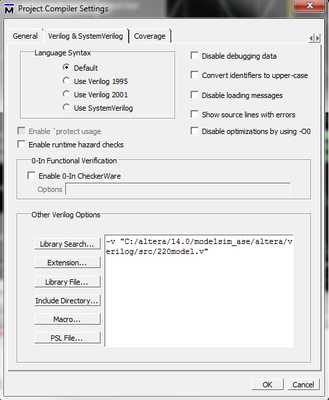
In Modelsim right click on the source file that contains the declaration of the Megacore. Then, select the Properties option.

There select the Verilog & SystemVerilog tab, click on the Library File button in the lower part, and select the file where the component is declared.

Here be careful to select the .v file as it needs to compile it and add it to the work directory.

/images/simulate_megacores.thumbnail.png

adding library to compiler options

Installing HandBrake to cut videos in linux

Looking on the web for a quick and easy way to turn a video 90 degrees using the terminal I found HandBrake.

following this forum this is how I installed it:

there are two official HandBrake PPAs, ppa:stebbins/handbrake-releases and ppa:stebbins/handbrake-snapshots. The former contains stable releases, which are updated about once a year. These releases tend to be rather out-dated when their end-of-life is approaching. The current stable version (0.9.8) was released on 2012-07-18. The latter contains nightly builds, which are updated daily (or nightly, as it were). These are of course less stable, and undocumented to boot, but they are good software nonetheless. Additionally, as the stable release ages, the developers tend to start recommending users to try the nightly builds instead.

To add one of these to your sources, simply run:

sudo add-apt-repository ppa:stebbins/handbrake-releases

or

sudo add-apt-repository ppa:stebbins/handbrake-snapshots

depending on which you want.

sudo apt-get update
sudo apt-get install handbrake-gtk

Alternatively, if you would prefer the CLI over the GUI, replace the last line with:

apt-get install handbrake-cli

Now, how to rotate a video 90 degress using HandBreak?

HandBrakeCLI -i /home/luisardila/Desktop/Comm/Luis.mp4 -o /home/luisardila/Desktop/Comm/Luis_90.mp4 --rotate=4

Creating a SSH shortcut

in your computer edit the following file:

.ssh/config

Include the following:

Host=rpi                         # Choose a name you will remember
Hostname=192.168.2.7             # your RPi ip  address
User=pi                          # User name on RPi, default=pi

now you can source the file

source .ssh/config

and then just ssh to your RPi using the shortcut

ssh rpi

finally type your password